Installation
Requirements
- The bossapp has been developed on MATLAB®, so the System Requirements are identical and can be derived from the MathWorks documentation.
- Microsoft Visual C++ Redistributable. This is a common requirement for most of Windows-related software, and may be already installed on your computer.
Instructions
Note
This installation guide is designed for Windows 11. If you are using Windows 10, it may look slightly different.
-
Click on the "bossapp_research_vx.x.xx_Installer_web.exe to download the installer.
a. The version number will change as updates are released. An example installer would be bossapp_research_ v0.4.17_Installer_web.exe
-
Open your downloads folder and double-click the file to run the installer.
a. If you did not download the installer into your downloads folder, navigate to the folder where it was downloaded.
Note
Depending on your institution, you may need admin or IT permissions to download software.
-
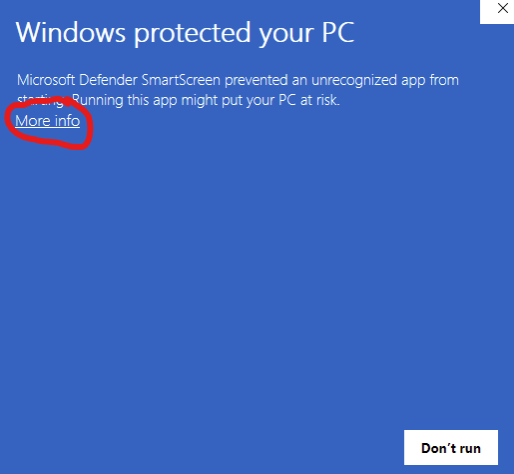
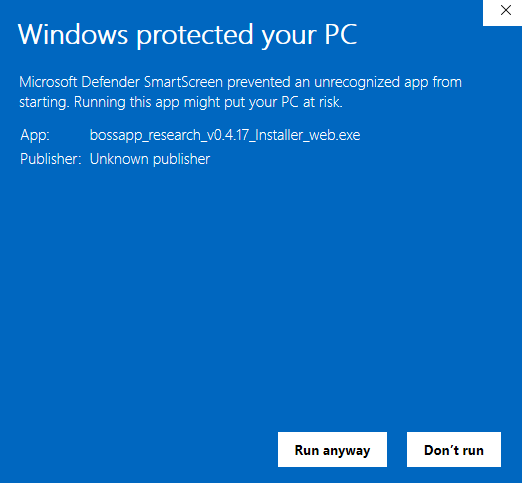
A warning window will pop up. This is because Windows does not recognize sync2brain as a common software provider.
-
Click "More info"
-
The window will advance, click “Run anyway”.
-
The next screen will be a pop-up window asking if you want to allow this app to make changes to your device, click "yes"
-
The sync2brain bossapp RESEARCH installer will pop up.
Note
The installer will disappear after a few moments; this is normal. Wait for a few moments, and a new window will pop up.
-
Click “Next” on the Installer. If you would prefer not to install in the default location, you can change it. You can also add a desktop shortcut (Recommended).
-
Click "Begin Install"
-
When the installer is complete, close the installer. The bossapp RESEARCH is ready to be opened.
Slow first launch after a new installation
It may take a few moments to open the bossapp RESEARCH on the first launch after a fresh new installation: you may notice a delay between the splash loading screen and the bossapp startup. Please wait, this is normal and the delay will be noticeably shortened in later sessions of the bossapp.
Enable Communication from Control PC to bossdevice
-
On your Control PC, from the Control Panel, navigate to Network and Sharing Center.
-
Click the Local Area Connection for the Ethernet adapter that you are using. It is often listed as Unidentified network.

-
Click the Properties button.
-
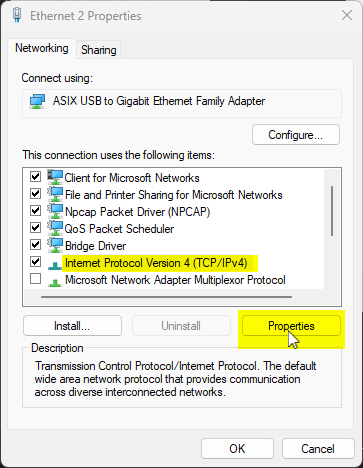
Select the Internet Protocol Version 4 (TCP/IPv4).
-
Click the Properties button.
-
Configure the IP address boxes:
Field Value IP address 192.168.7.2 Subnet mask 255.255.255.0 Default gateway leave blank 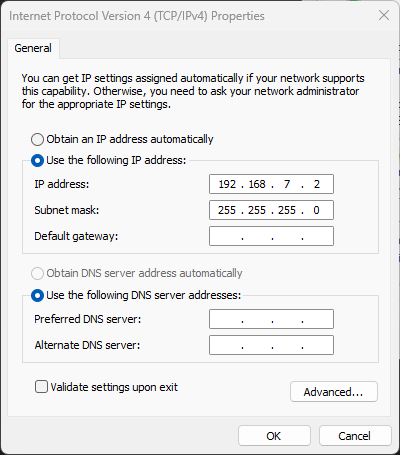
-
Click OK and close all open dialogs.
Windows Firewall Security Alert
You may get a Windows Security Alert from the Windows Firewall, the first time you attempt to connect to the bossdevice from within the bossapp. Please allow bossapp to access both "Private networks" and "Public networks".
Configuration of biosignal amplifier
The bossdevice assumes a digital sampling rate of 5kHz received in multi-sample UDP packets at a rate of 1kHz.
Brain Products Users
Please refer to the setup poster that came with your TurboLink to set the IP address and parameters of communication between the bossdevice and the TurboLink and the TurboLink and your BrainVision Recorder PC.
Configuration values for TurboLink
- In the setup poster and in the TurboLink software, the bossdevice is referred to as the "Data Client". Please use the IP address "192.168.200.255" for the "Data Client".
- In the TurboLink, please set the "Data Client Rate" to 1000Hz and do not check the "Packet rate" box.
- Ensure that the Ethernet cable connecting the bossdevice and the TurboLink is plugged into the bossdevice's "Biosignal" port.
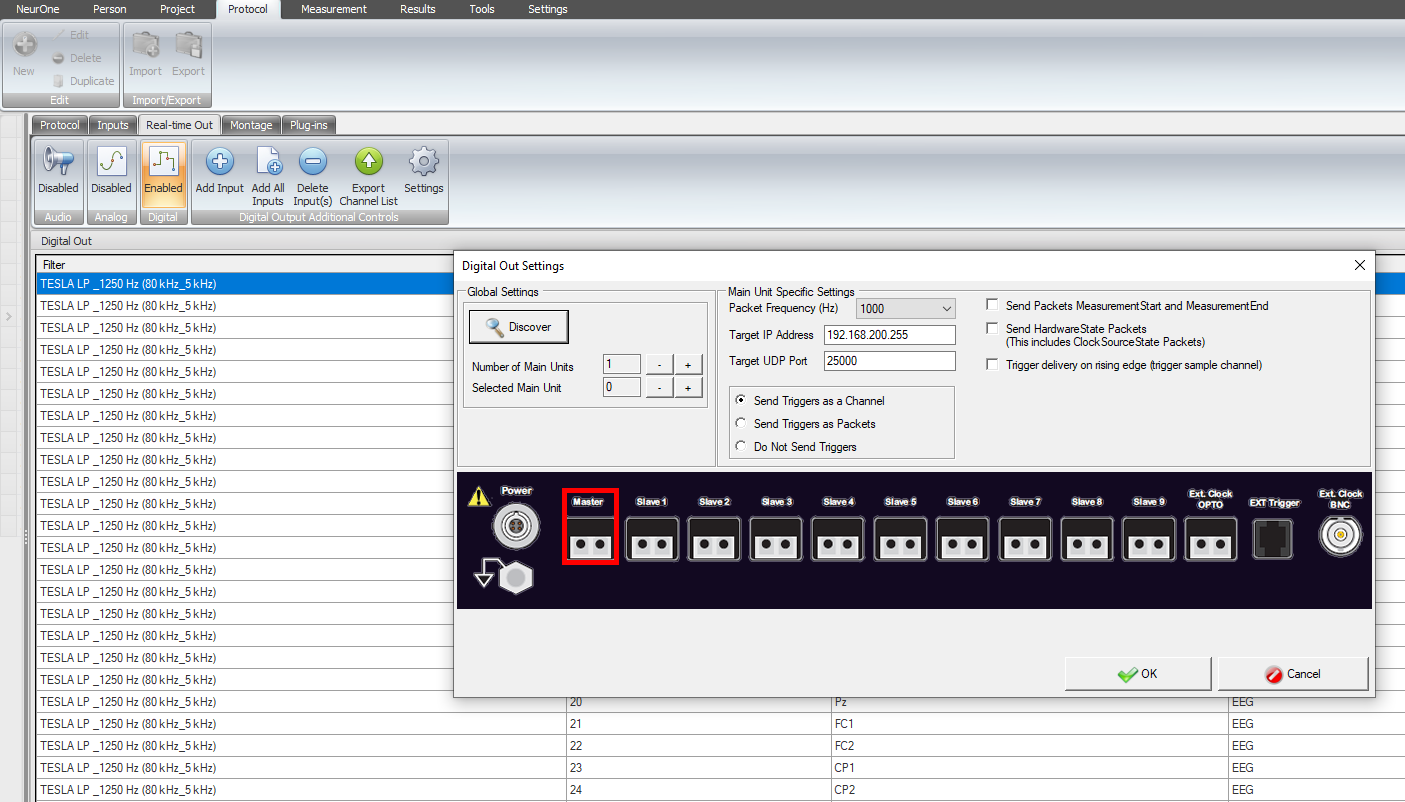
Bittium NeurOne users
In the NeurOne Software, the bossdevice is referred to as the "Target IP Address". To set the IP address, edit the protocol, go to the "Real Time Out" tab, then click "enable" for the "Digital" port. A pop-up window will appear.
Configuration values for NeurOne
- Enter "192.168.200.255" for "Target IP Address"
- Set the "Packet Frequency" to 1000
- Set the Target UDP Port to 25000
- Select "Send Triggers as a Channel"
- Leave all other boxes unchecked.
- Ensure that the Ethernet cable connecting the bossdevice and the NeurOne goes from the Main Unit's "Digital OUT" port to the bossdevice's "Biosignal" port.