Starting a New Session
Each new session, even for sessions using the same protocol and sessions with a participant you have run in the past requires some setup, parameter tuning, and monitoring. This section of the manual highlights actions that should be taken each session to ensure the protocol is running successfully.
Matching Protocols Across software
There are three protocol files involved in a bossapp RESEARCH study.
- The EEG Recording Software protocol. (For example, within BrainVision Recorder for Brain Products amps and NeurOne for Bittium amps)
- The bossapp RESEARCH EEG configuration.
- The bossapp RESEARCH protocol.
Before starting, ensure that all three are the correct file for the study and match each other. The EEG recording software protocol will be in a specific format for your EEG recording software, but both the EEG configuration and protocol file within the bossapp RESEARCH are saved as MATLAB files. It is helpful to add "bossapp EEG Configuration" and "bossapp Protocol" in the filenames to distinguish them.
Checking the bossapp EEG Configuration
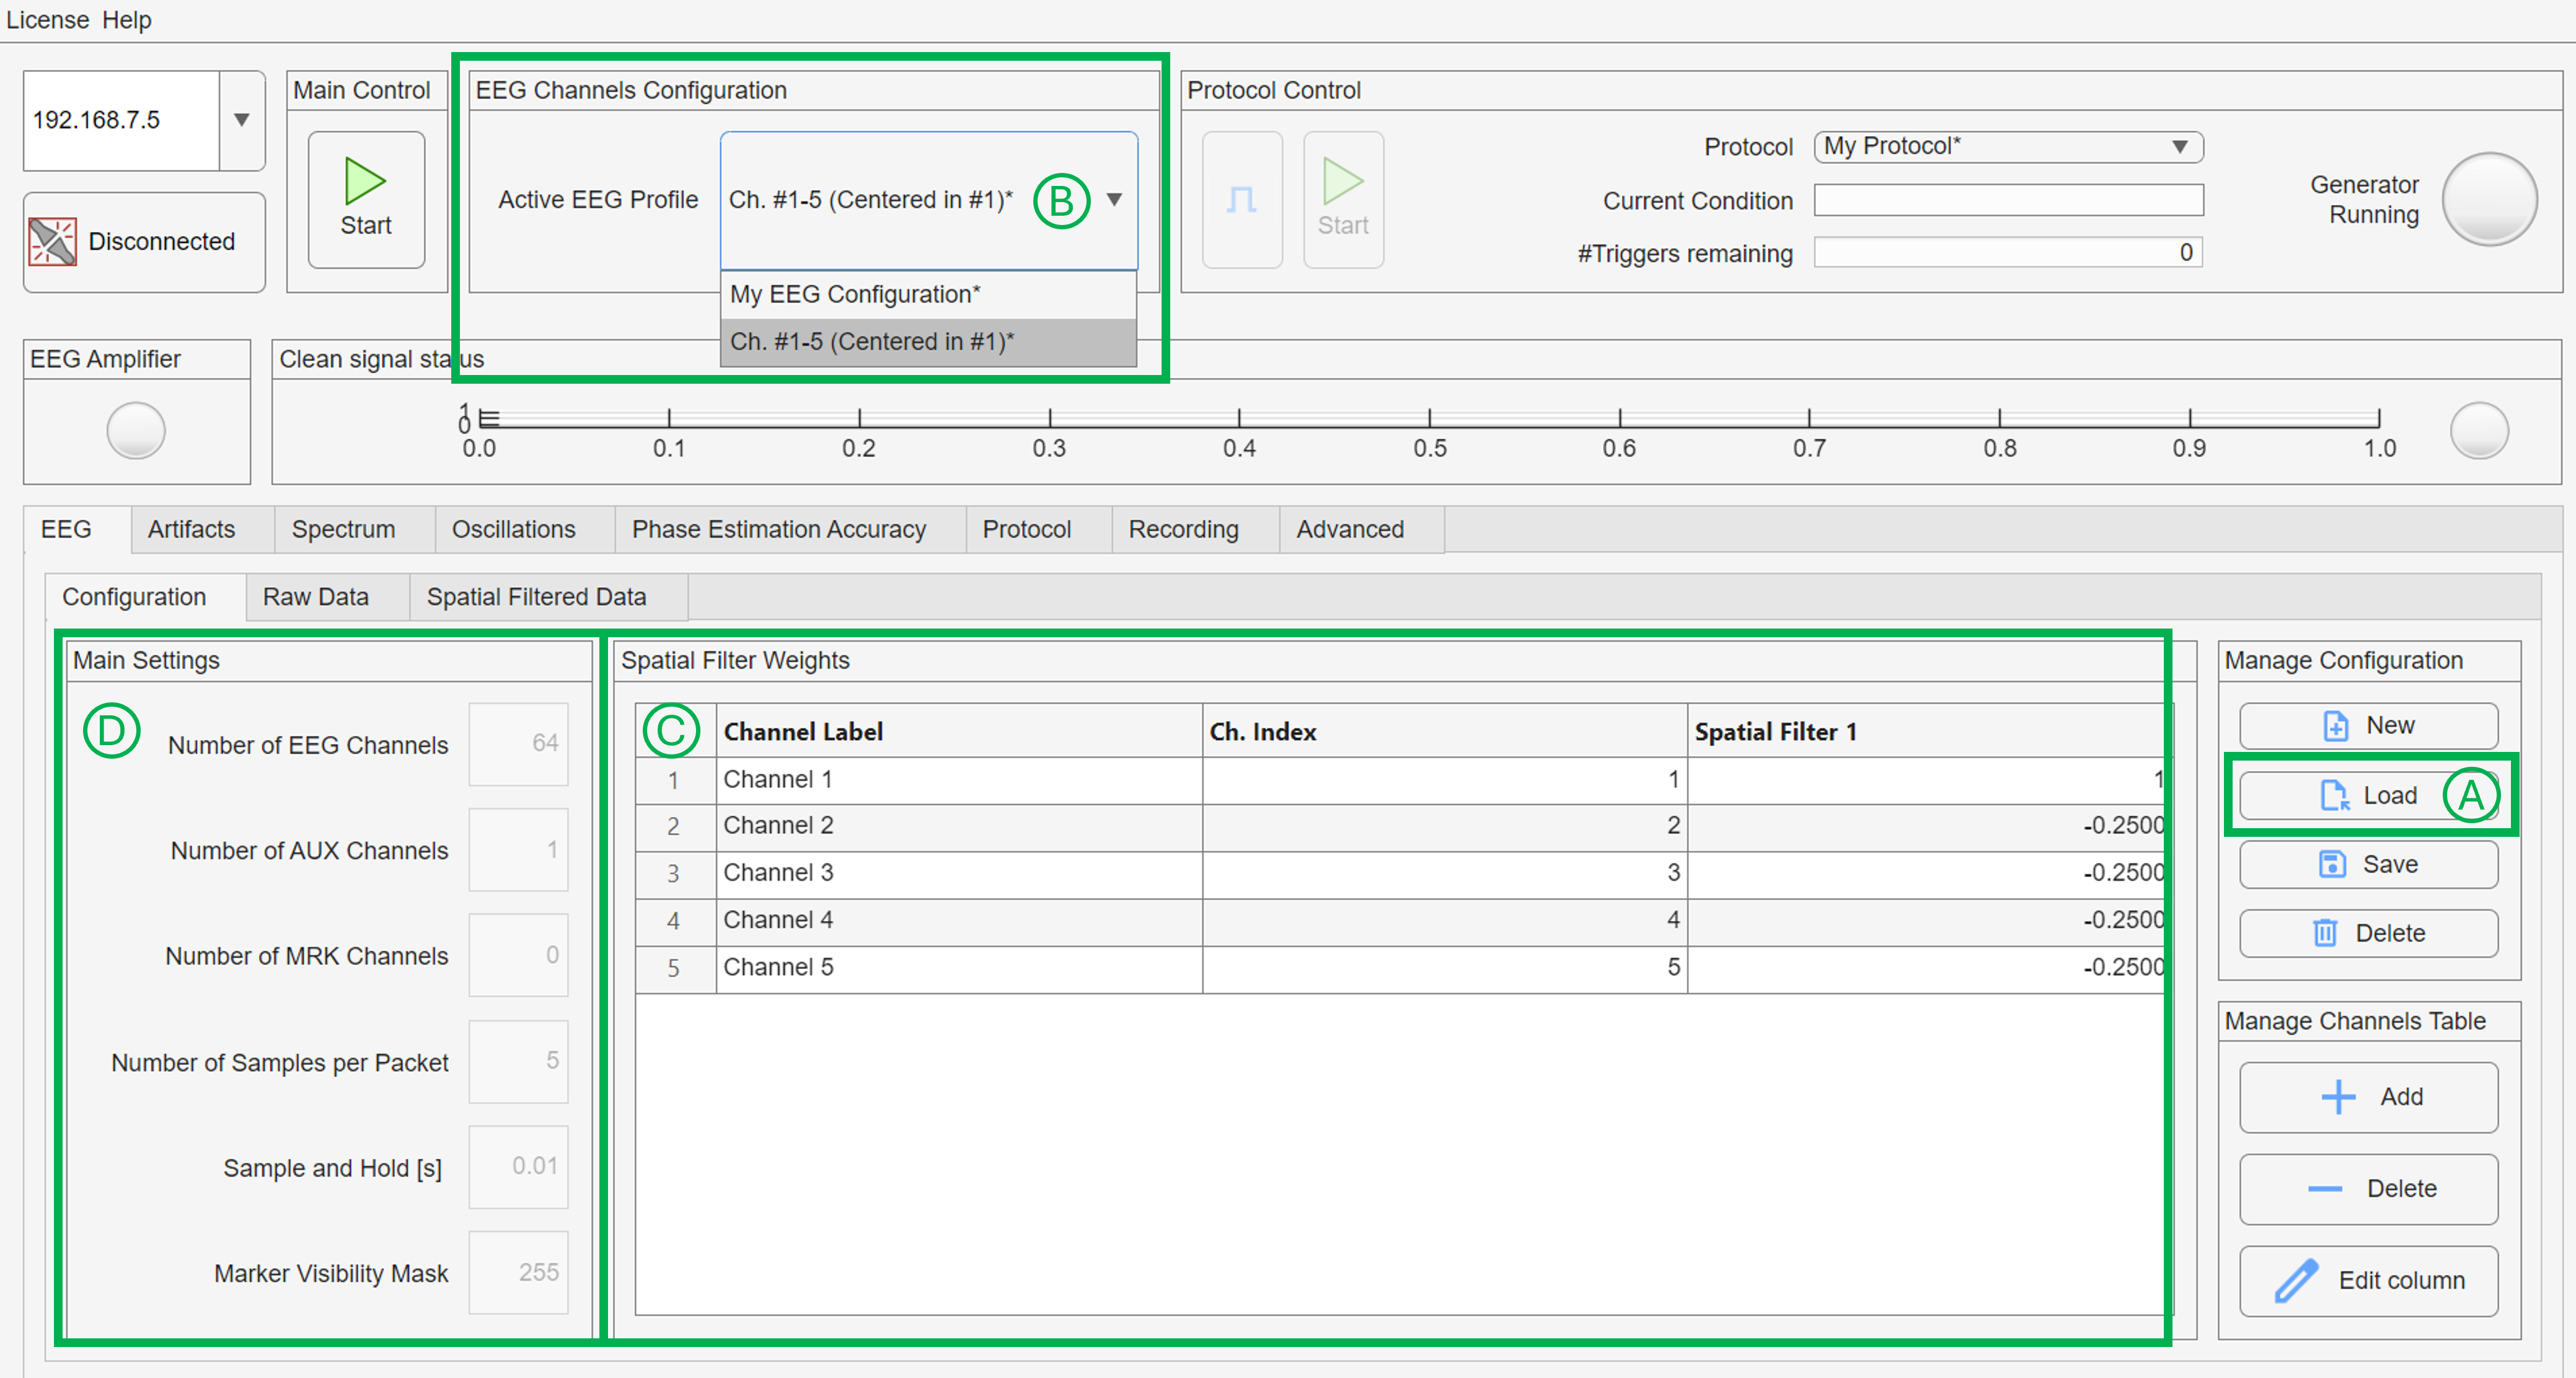
Use the "Load" button (A in the image), to load your saved bossapp EEG Configuration. Once opened, ensure that the correct EEG Channel Configuration is selected in the dropdown in the Top Bar (B in the image). It is always a good idea to quickly check the channels and settings (C and D in the image) to make sure they look how you expect for this protocol.
Checking the bossapp Protocol
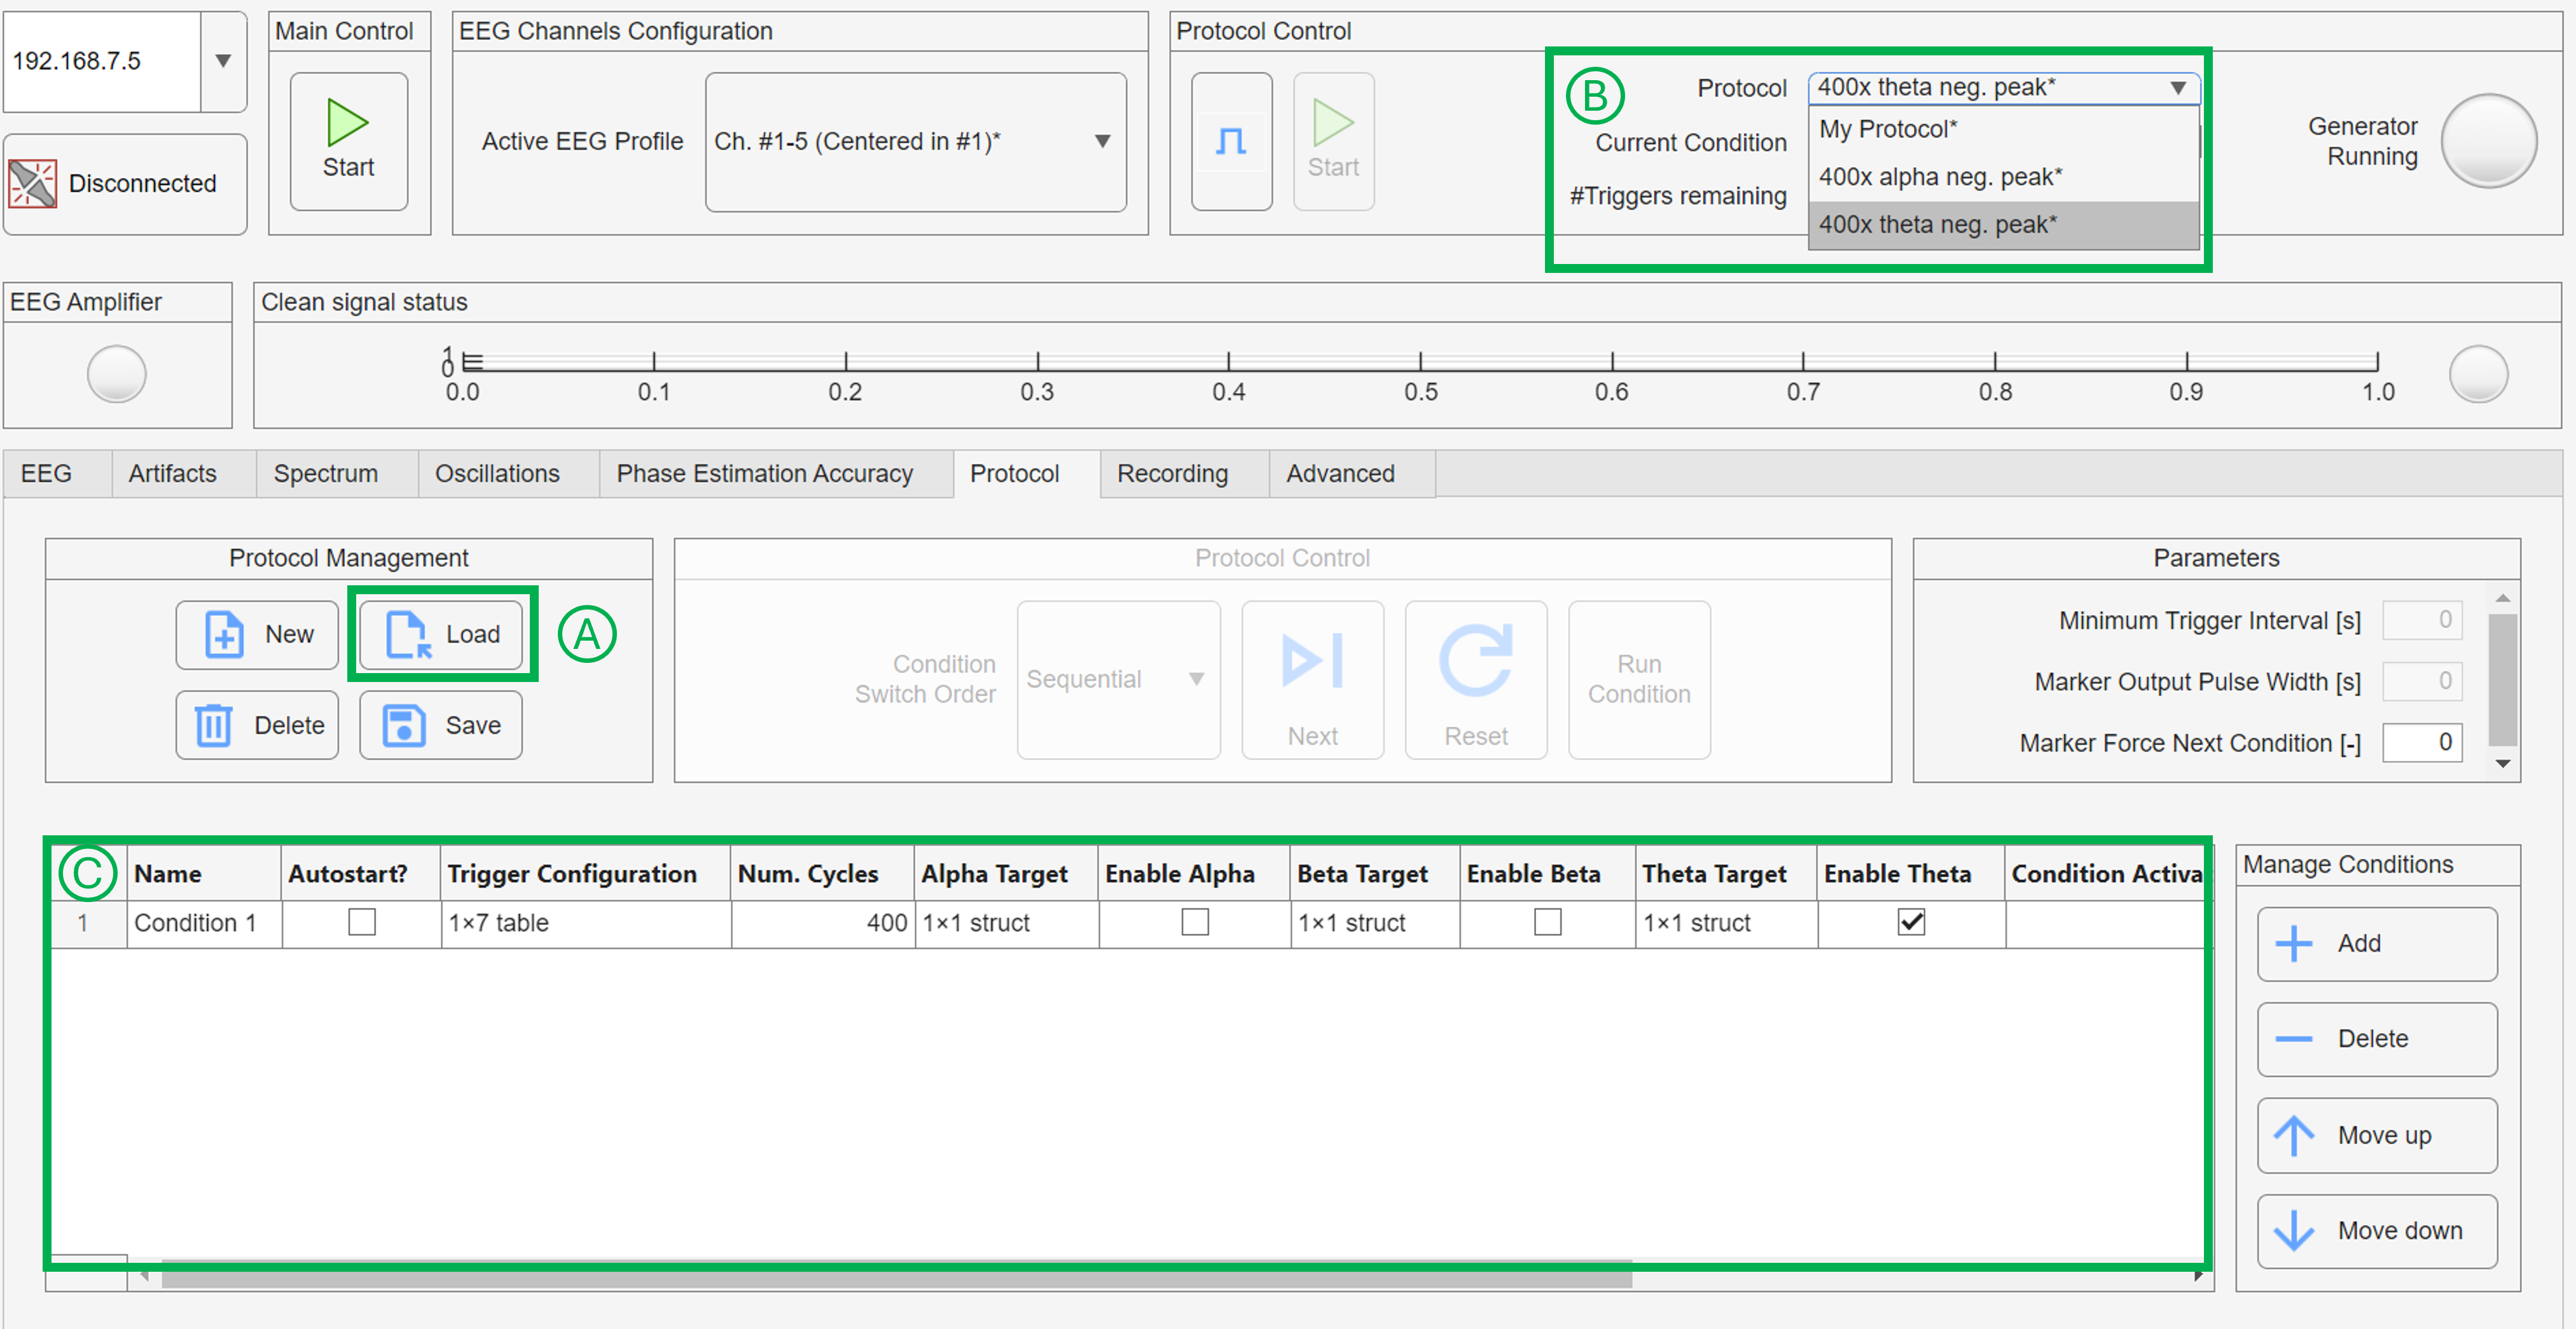
Use the "Load" button (A in the image), to load your saved bossapp Protocol. One opened, ensure that the correct Protocol is selected in the "Protocol Control" Protocol dropdown (B in the image). It is always good to quickly check the conditions in the protocol to make sure they look how you expect.
Turn on and check all devices
Ensure that all devices including the bossdevice RESEARCH, your EEG amplifier, and any intermediate or auxilliry devices are turned on. If they have been left on for a while, it may be good to turn them off for a minute or two and then turn them back on. Ensure that all devices are connected correctly.
Connection to bossdevice
Within the bossapp, click the "disconnected" button on the left side of the Top Bar to establish a connection to your bossdevice. The button will switch to "connected".
If connection failure, likely causes are:
- Your bossdevice was not turned on
- The Ethernet cable from your computer to the bossdevice was not plugged into the "Control PC" slot on the bossdevice.
- The wrong IP address was entered in the IP box on the top left of the bossapp. It should be 192.168.7.5
- The IP settings have not been configured on your control computer Jump to IP Setup
Connection to amplifier
Once you have established a connection with the bossdevice, turn the EEG amplifier on and check that the bossapp has established a connection to the amplifier. You may need to start streaming data on your EEG Recording software before the bossapp establishes a connection depending on your EEG system. You will know that the connection is established when the "EEG Amplifier" lantern on the left of the Top Bar turns on and the name of your EEG amplifier shows on the bottom right of the bossapp.
If Amplifier Connection Failure, likely causes are:
- The data streaming Ethernet cable from your amplifier was not plugged into the "Biosignal" port on the bossdevice.
- The wrong protocol is open in your EEG recording software.
- The IP address for the bossdevice is not correct in your EEG software. Please refer to the instructions sent by your amplifier supplier.
- The hardware configuration and setup for your amplifier is not correct. Please refer to the instructions sent by your amplifier supplier.
Check Triggers
 It may be helpful to test your triggers at this point, before your participant arrives. Turn on your TMS unit and set it to a single pulse ensuring that the coil is not pointing at anything that would be damaged. Turn on any other devices or systems that are going to recieve triggers during the session and start a short recording on your EEG recording software. Use the "Send Manual Trigger" button (shown in image above) to send a few test triggers to your devices. Ensure that the TMS unit is receiving them and firing, and that they are showing up in your data streams and anywhere else they may be expected. If they are not, check the hardware and connections.
Test Trigger Sequence
- If you have a protocol open and selected, pushing "Send Manual Trigger" will send the trigger sequence associated with your first condition. If your first condition does not send all triggers for your protocol, the triggers not included in condition 1 will not show up in your test.
Info
A common reason TTLs fail for TMS units and other devices that use binary TTLs with BNC cables is that the TTL pulse was too short for the device to recognize. Try increasing the length of the TTL trigger (see trigger setup) and check your manual for a minimum length requirement.
Cap your participant
Using your EEG recording software, cap your participant and reduce impedance. It may be useful to take a short test recording to check for sources of noise, bad electrodes, etc. at this point and address them before continuing.
Find individual peak frequency
If you are tuning the bossapp's peak frequency bandpass filters for each participant, take a short recording now and use it to find the participant's peak(s) as needed for your study.
Then go to the Oscillations tab and click the Tune Filters button on the left side. Enter the peak(s) for your subject as appropriate and click "OK". Unused frequency bands can be left at default.
Tuning Parameters
You are almost ready to start your closed-loop protocol. There are just a few parameters that need to be adjusted at the beginning of each session and may need to be adjusted thought the session due to issues like fatigue, EEG quality changes, comfort, etc. They are as follows.
- The Eyeblink artifact threshold on the "Artifacts" tab.
- The Range artifact threshold on the "Artifacts" tab.
- The "Amplitude" threshold on the Oscillations.
Click "Start" in the "Main Control" box in the top bar to start streaming data. You can now flip through the tabs and explore the data streams and update parameters.
The adjustments are unique to each participant and study design. We cannot give exact recommendations, however it is usually appropriate to tune them so that the "Clean signal status" lantern in the Top Bar stays green for 5 seconds at a time. Much longer shows that the threshold are not restrictive enough and much shorter shows that they are too restrictive.
Thresholds must be set for every session
Each time the bossapp is restarted, all threshold are reset to maximum value. You must set them for each session or they will be arbitrarily high and result in poor performance.
Quality Checks
After starting the Main control and streaming data, the bossdevice is already calculating metrics. After a three minutes, go to the spectrum tab and click "update spectrum". Check the PSD and SNR plots for signs of excessive artifacts and the SNR plot to ensure there is a peak at your signal of interest. If artifacts are found or SNR is low, try to improve EEG data quality and or adjust the 3 parameters to be more restrictive. It may take a few minutes before adjustments are represented in the plots.
In the "Phase Estimation" tab, ensure that you have your oscillation of interest selected in the box on the top left and click "Update". If prediction performance is low, try to improve EEG data quality and or adjust the 3 parameters above to be more restrictive. It may take a few minutes before adjustments are represented in the plot.
Variation between people
If your EEG data quality is high, your participant is comfortable, there are no large artifact producing technologies in the room, and your parameters are tuned appropriately, it is still possible that due to natural variation between individuals, the signal of interest, and the weights of your electrodes, that the bossdevice will not be able to detect and predict the signal of interest in this particular participant. It could be a good idea to re-check that your protocols and montages are correct (especially the channel indices). If this occurs for a large number of participants, it may be helpful to re-design the channel weights for the signal of interest.
Setting up and arming the TMS machine
Once you are happy with your signal quality and your parameters are tuned, you are ready to set up your TMS machine. Enter the stimulation parameters and design, place the coil, and ensure it is armed and ready to fire.
Recording data using the bossapp
Recording data through the bossapp RESEARCH is possible, but this feature is still under development. It is recommended to always record and save all data using your EEG software and not to rely on the bossapp for saved data. Until the full implementation of the record feature on the bossapp, users should plan on doing analysis on the data from the EEG software.
To use the bossapp recording feature, go to the Recording tab and click "start recording" at any point after you have started the "Main Control". If you would like to break your recording into separate sections, you can return to the "Recording" tab at any time and click "stop recording" and then "Start recording" again when you are ready. If you have a built-in break between conditions, that would be a good time to stop/start the recording. The recording starts as soon as it is pressed, even if the protocol is not started for a while after recording starts.
Warning
If chunking the recording by stopping and restarting, keep notes on which events or conditions are associated with each block index. The saved files do not have names for each recording, just chronological indices.
Starting the Protocol
When the TMS is armed and ready to fire, go to the "Protocol Control" box in the Top Bar and click "Start" The protocol will automatically run through any conditions you have defined.
Monitoring and Adjusting during the session
The protocol will continue to run even if you switch tabs or take other actions within the bossapp. It is recommended to monitor the data on the "EEG", "Spectrum", and "Oscillation" tabs as well as occasionally check the Phase Estimation Accuracy. If performance decreases or the Clean Signal Status stays red for longer than expected, adjust the 3 parameters as needed. If performance stays poor, you may pause the protocol and check-in with the subject or adjust the cap.
Consider changes throughout the session
Data quality may change throughout the session due to factors such as fatigue, subject comfort, increased EEG impedance, etc. Therefore, it is important to monitor the data and adjust parameters as needed.